There are many reasons why you might need to export data from Gmail or Google Drive, ranging from fulfilling discovery requests to adhering to retention requirements. As a leading collaboration platform, Google Workspace holds a wealth of potentially relevant data like financial records and personally identifiable information (PII). This information, commonly found in Gmail and Google Drive, can be crucial for corporate IT, legal, compliance, or support teams working on various matters.
Whether you require a one-time or recurring Google data export, we'll guide you through three main options: Google Takeout, Google Vault, and a third-party solution that connects directly to Google Workspace's API. Let's dive in.
Option 1: Export Gmail and Google Drive data with Google Takeout
Google Takeout is a free tool that allows you to export and download your data from various Google products, including Gmail and Google Drive, in a single file. This option is ideal for personal accounts, as it requires your login credentials.
Follow these steps to export and download your Gmail and Google Drive data using Google Takeout:
Step 1: Select the data for your download archive
- Visit the Google Takeout website at https://takeout.google.com/ and sign in.
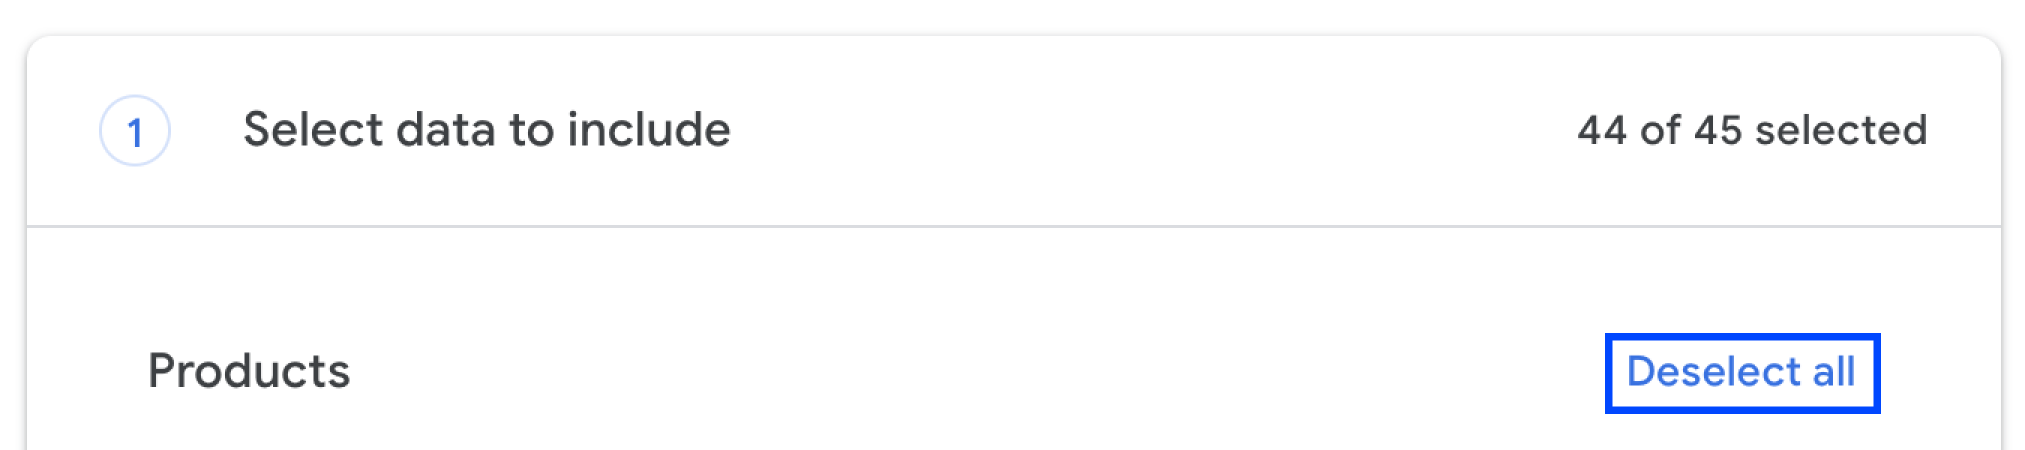
- Deselect all products by clicking “Deselect all” at the top of the page.
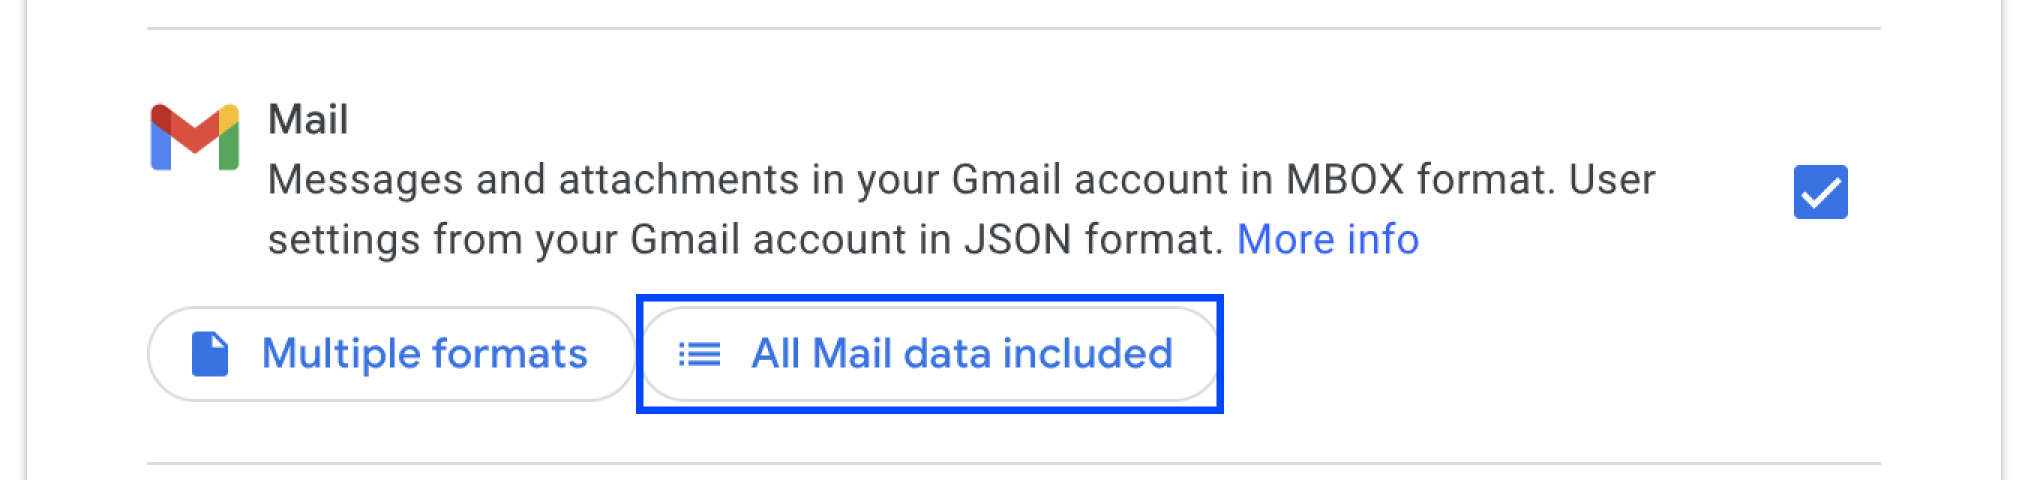
- Locate "Mail" in the list and check the box next to it.
- To download specific Gmail data, click "All Mail data included," deselect "Include all messages in Mail," choose your desired labels or categories, and click "OK."
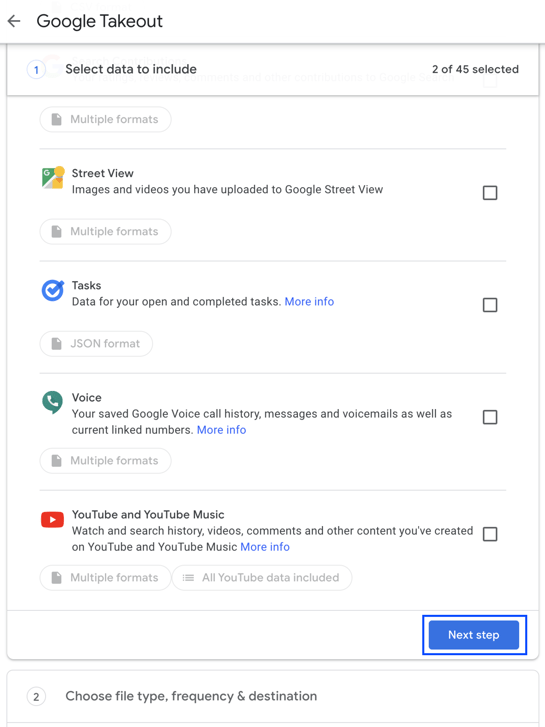
- Find "Drive" in the list and check the box next to it.
- For specific archive formats, choose "Multiple formats" and click "OK" when done.
- To include named, published, uploaded versions, or additional info for files and folders, check the boxes under "Advanced settings" and click "OK."
- For downloading specific files and folders in Drive, click "All Drive data included," deselect "Include all files and folders in Drive," choose your desired folders and file types, and click "OK."
- Scroll to the bottom of the page and click "Next step" to proceed.
Note: Your data file may not include changes made between your request and the archive creation, such as:
- Changes to sharing type or permissions of a Drive file
- Resolved comments on a Drive file
- Added or deleted photos or albums
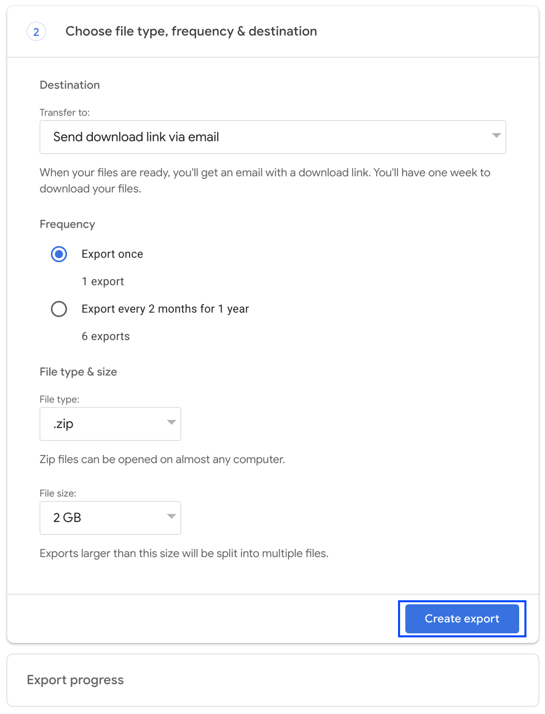
Step 2: Customize your archive format
- Select a delivery method: download link via email or direct transfer to a cloud storage service (e.g., Google Drive, Dropbox, OneDrive, or Box).
- Choose the export frequency (once or every 2 months for 1 year).
- Select file type and size; multiple archives will be created if data exceeds the maximum size.
- Click “Create export.”
Step 3: Export your Gmail and Google Drive data
- Wait for the export process to complete. You'll receive an email with a link to the archive once it's ready, which may take minutes or days depending on your account's data volume. Most users receive the link on the same day as the request.
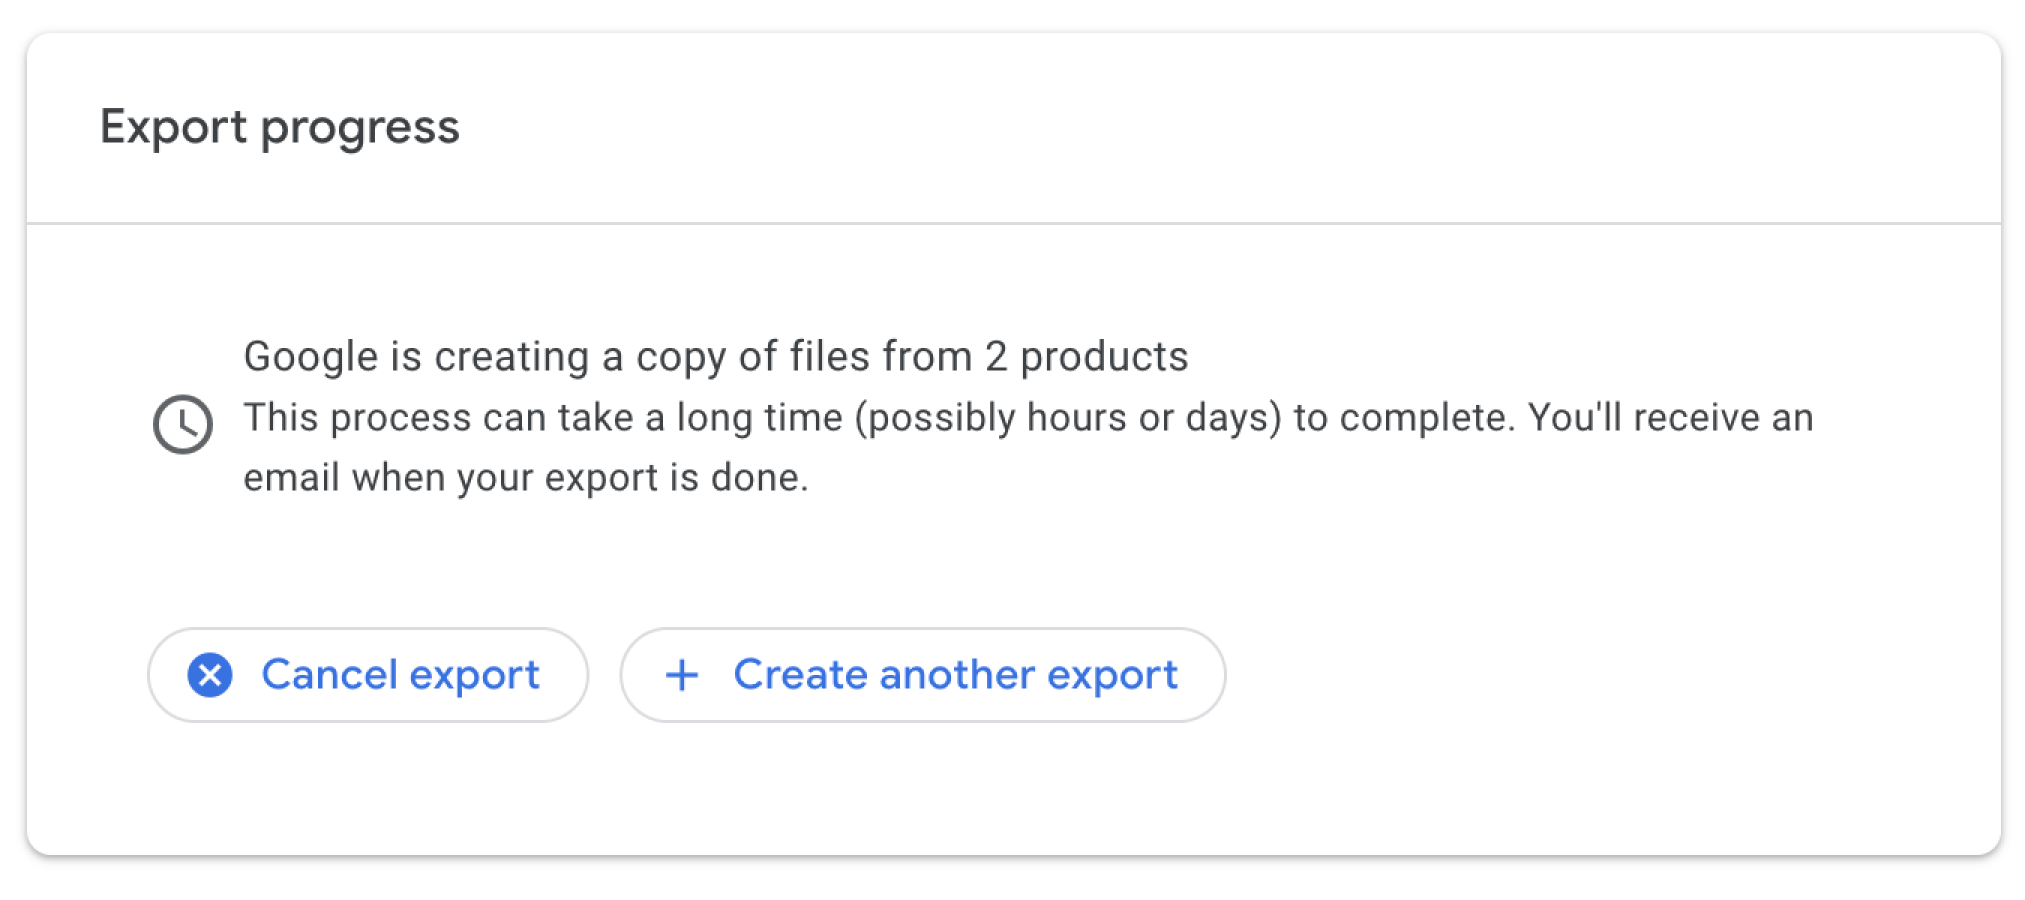
Note: For users in the Advanced Protection Program, the archive will be scheduled for two days in the future.
Remember that Google Takeout isn't a complete backup solution. While helpful for data archiving, it limits you to three backups per day and seven per week. Data recovery can be difficult, as different file types are spread across multiple zip files and require sorting and organization.
Option 2: Export data from Gmail and Google Drive with Google Vault
Google Vault functions as a data management and eDiscovery tool for Google Workspace users. Available to those on Business Plus, Enterprise, Education, or G Suite Business plans, Vault allows users to retain, hold, search, and export data from Gmail, Google Drive, and other supported services. It's important to note that Google Vault is exclusively available to Google Workspace administrators, and not to personal Gmail account holders.
To export and download Gmail and Google Drive data from Google Vault, follow these steps:
Step 1: Sign in to Google Vault
- Go to https://vault.google.com and sign in with your Google Workspace account.
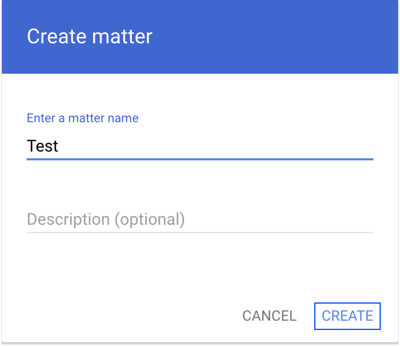
Step 2: Create a matter
- Click “Matters,” then “Create.”
- Enter a name for the matter, and optionally, provide a description.
- Click "Create."
Step 3: Set up a search
To find data in Vault, you need to search each Google service individually. Complete the following steps for Gmail, and then do the same for Google Drive.
- Open the newly created matter or an existing matter from which you want to export data.
- Select “Search” from the top menu bar.
- Choose the desired service (Gmail or Drive) from the "Services" dropdown menu.
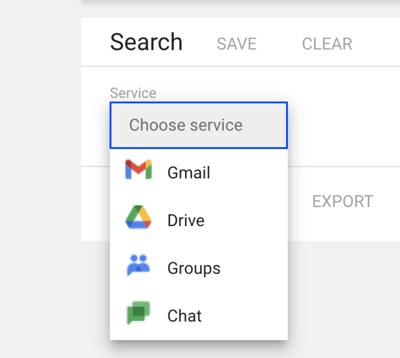
- Input terms, set date ranges, or select accounts to define your search criteria, and then click "Search."

- Repeat steps 2-4 for the second Google service.
Step 4: Export search results
- Once the search is complete, click "Export" located above the search results.
- Name your export without using special characters, as they can hinder the download process.
- Set up service-specific export options. For Gmail data, select from two options:
- Choose whether to include or exclude confidential mode message content. Excluding this content will result in an export containing only message metadata.
- Opt for the new Gmail export process. For messages, choose the format for message content files: PST or mbox. Note that metadata files, error reports, and count files will be in a different format than classic exports.
- If your organization has a data region policy in place, select the appropriate data region for the export.
- Click “Export.” The export progress will begin, which can take anywhere from several minutes to hours, depending on the data volume.
Remember, you can have no more than 20 exports in progress at once.
Step 5: Download your exported data
- After the export finishes, click the "Exports" tab in the left sidebar menu.
- Locate the export you created and click the download icon next to it.
- Follow the provided instructions to download the exported data as a ZIP file.
Keep in mind that Google Vault exports may contain metadata and other information that requires specialized software to open and read. Additionally, you may need a third-party tool to restore or import the exported data back into Gmail or Google Drive.
Option 3: Supercharge collections with a third-party solution
If Google's built-in export features don't fulfill your requirements, consider using the Google Workspace API as an alternative. This API allows for smooth data transfer to an eDiscovery solution, which processes the data and metadata, converting them into an easily readable format that accurately presents messages and files in their original context.
Onna effortlessly integrates with the Google Workspace API, optimizing early case assessment workflows by effectively identifying relevant information across siloed data sources and culling it through filters, tags, and advanced search functions. This approach significantly improves eDiscovery effectiveness, minimizes risk, and reduces review costs.
Instead of searching one Google service at a time, Onna empowers users to conduct simultaneous searches across Google Drive, Gmail, and other external data sources within a unified workflow. The end result? A more efficient, user-friendly, fast, and comprehensive data collection process.
To collect and export Gmail and Google Drive data using Onna, follow these steps:
Step 1: Connect
- Open the workspace where you want to set up your sync.
- Click the '+' icon at the top-right corner of the screen and choose “Add source.”
- Choose ‘Google Workspace,’ as your source and assign a name to your new sync.
- Click “Continue.”
Step 2: Collect
- Choose the sources and content you want to sync.
- Select your preferred synchronization mode (One-time sync, auto-sync and archive, or auto-sync).
- Set a sync start date. Leaving this field blank will prompt Onna to sync all available data. If you've opted for a one-time sync, you can also set a sync finish date.
- Click “Next.”
- Add users to your sync using either of the following methods:
- Manually enter email addresses in the “Account” field.
- Click the “Load users list” link at the top-right corner of the window to display a list of users. Use the filter bar to search, select all users, or scroll down and choose individual users.
Note: To sync any future users, check the corresponding box.
- Click “Next.”
- Select the Google Drive folders to sync and click “Next.”
- Choose the shared drive folders to sync and press “Done” to initiate the sync process.
Step 3: Search
Onna simplifies your search process by allowing you to search Google Drive and Gmail simultaneously, rather than searching for content on each service separately like you would in Vault. To search for data across both Gmail and Drive, follow these steps:
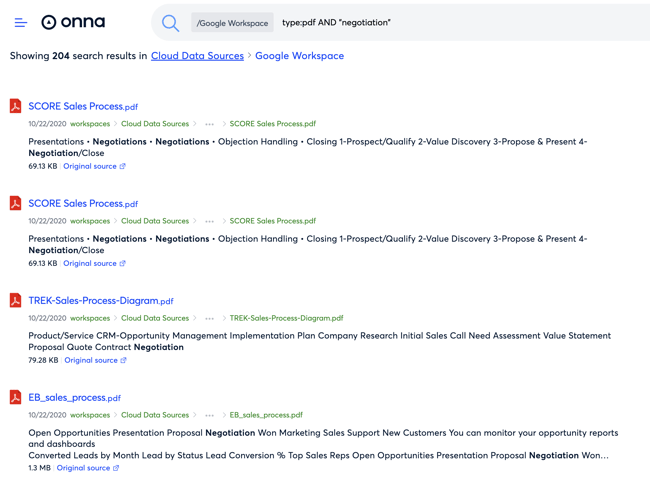
- Click on your Google Workspace source and type your search query in the search bar.

- Press the 'Return' key on your keyboard to generate the search results.
- The search will provide a list of results that match your criteria. You can also modify how the search results are displayed and use filters to narrow your search even further.
Note: Searching across both Gmail and Google Drive simultaneously provides a more efficient, accurate, and comprehensive method for identifying and collecting pertinent data; however, you can also choose to exclusively search either Gmail or Google Drive if desired.
Step 4: Export
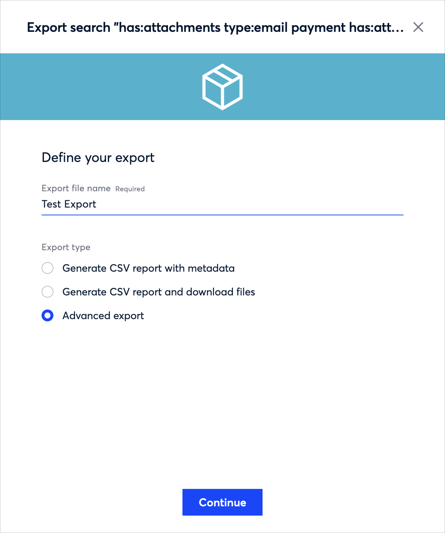
- When you're ready to export your search results, click the ellipsis located on the right side of the search bar to reveal the menu. Then, choose "Export search.”
Note: You can also opt for "Save search query" to save your search and export it later.
- Choose your preferred export option and click “Continue.”
- Choose the metadata fields you want to include in the export and click "Next."
- Set up the numbering and format for the export, then click "Next."
- A summary of the report will be displayed. Click "Done" to initiate your export.
- You will be automatically redirected to the export summary page. Here, you can view the details of your export, track its progress, and download the exported data once it's complete.
If the idea of exporting data from Gmail and Google Drive separately, uploading multiple files one by one for early case assessment, sorting and organizing diverse file types spread across multiple zip files, and dealing with limitations on what, when, and how data can be collected sounds daunting, then this option may be the most suitable for you.
Retrieving your data is just the start
Ultimately, effectively managing your Google data involves more than simply retrieving it. The export option you choose should suit your timeline, data needs, and requirements for searching across or producing less data. It's also important to consider how you will search the data, protect sensitive information, and handle any challenges that may arise. The optimal solution will provide you with a fully searchable and up-to-date repository of your Google data, which is much more valuable than a basic data dump.
If you’re concerned that regular data exports may be unnecessary or are hesitant to add another tool to your tech stack, rest assured that versatile solutions are available. These solutions can integrate with Google Workspace and other workplace apps such as Microsoft 365, Slack, Zoom, and more, which you may already be using – and our solution happens to be one of them.